
Over Lawnmower Storage Shelves
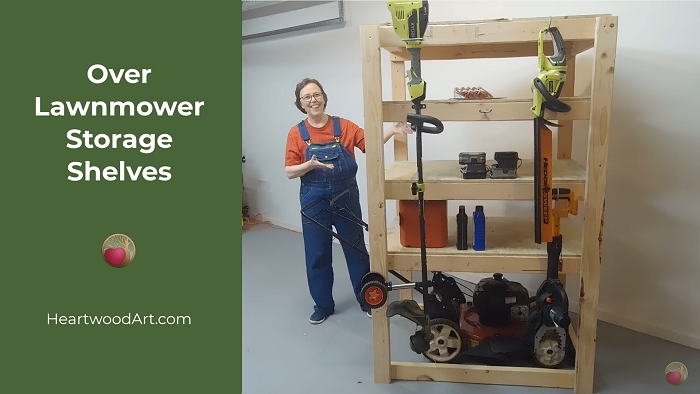
See how I built this free-standing, garage shelf unit with an open bottom to store my push mower.
Material
2×4 Lumber
- 4 at 72″
- 10 at 45″
- 4 at 30″
Plywood
- Use 1/2″ or 3/4″ plywood sheets
- 4 at 33″ x 45″ – I would not cut this until after your frame is complete
Screws
- #9 x 2-1/2″ Construction Screws – can also use #10
- #8 x 1-1/4″ Construction Screws
- Optional – 2-1/2″ Kreg Screws
Tools
Hand Tools
Power Tools
Nice to Have Tools
Kreg Tools
Video Tutorial
Subscribe to the Heartwood Art YouTube Channel
for more helpful tips like this

Written Transcript
Hello, I’m MaAnna with Heartwood Art.
And today, I’ll show you how I made this over-the-mower shelving unit.
It’s great for getting your push mower out of the way, hanging your tools, and storing their accessories and more.
Be sure to come visit me at Heartwood Art and follow this YouTube channel for more helpful tips.
Okay, let’s dive in.
Measure Mower
First, measure your mower.
I placed some scrap 2x4s around my mower to help me get my width and depth measurements.
The boards on the side are 45″ long. I’m repurposing them from another build, so that has everything to do with why I chose that depth.
With this depth, my mower handle bar will stick out about 1-1/2″ and I’m fine with that.
The interior width is 30″.
Be sure to adjust these dimensions for your mower, and if you plan to store it with the exhaust piece, or a bag or such.
Side Frame Dimensions
You will need to build 2 of these frame sides.
Here are the dimensions:
- The uprights are 72″.
- From the top of the back 2×4 at the bottom to the bottom of the first shelf 2×4 is 21″.
- My plywood is 1/2″.
- So from the top of that plywood to the bottom of the next 2×4 is 11″
- Same for the next shelf up.
- Of course, the 2×4 side rail at the top is flush with the top of the upright. That gives you 10″ from the top of the plywood to the bottom of that 2×4.
Side Frame Layout and Build
If you have tools that would help you square your side frame another way, then use that.
I was working solo and this is how I chose to do it.
I put the brakes on the wheels of my workbench and clamped the 72″ upright pieces to it vertically.
No matter how you do this, you will have to check square and plumb on 3 sides to ensure that it is standing straight.
Then lay one of the 45″ boards on the floor.
And check square every way you can and clamp into place.
Screws for Frame
I’m using 2-1/2″ construction screws for the frame.
And since all the weight of the shelves will ride on these screws, I used a 3-point pattern. A 4 or 5-point pattern would be overkill for what I’ll be placing on the shelves.
You do what works best for your needs.
Shelf Boards for First Side Frame
To get me off the floor, I placed extra 2x4s on my bench and then laid the side frame on those. This will allow me to clamp the rest of the rail boards to the vertical frame pieces.
I measured from the bottom 2×4 and placed the first shelf board.
Be sure to check for square on both sides and then clamp.
Then countersink and add screws to both sides of the board.
Repeat for all 4 shelf boards.
But when you get to the top board, be sure to check for square by taking diagonal measurements from the bottom corner to the top. You may need to “pull” your vertical frame boards a little one way or the other to adjust for square.
Shelf Boards for Second Side Frame
To ensure I made the second side frame exactly like the first, I placed it on top of the first frame, but with the insides together.
Then I squared, and clamped the top shelf board and placed one screw in the middle to hold it.
Then I flipped the second frame over and added the normal 3 screws on each side to that top board.
After that, it was just a matter of lining up the other 3 shelf boards to match the ones on the other side frame.
And then clamping and screwing them in.
Install Stretchers to One Side Frame
This is the process I used. If you have a helper to hold up the sides, that would work too.
Lumber
You’ll need all 4 of your 30″ 2x4s for this.
But, you’ll only be screwing in 3 of them. The spare is for the front opening, where you roll your mower in, just to help keep the whole frame square.
Screws
I used pocket hole screws for attaching the stretchers to the side frames.
The settings are:
- Bit – 1-1/2″
- Screw – 2-1/2″
But I didn’t find the screws to hold it tight enough, so I used the same #9 2-1/2″ construction screws in the Kreg holes.
Be sure not to over tighten them or they will split the wood!
Plus, drilling for pocket hole screws allowed me to use my pocket hole clamp to help hold the stretcher board in place while I installed the first screw on that side.
Install Top, Back Stretcher
I flipped the frame upside down and clamped it to a pole in my shop.
That way I could use the floor to ensure the top, back stretcher board was square and level to the frame.
Install Top, Front Stretcher
Next, install the top, front stretcher.
I laid this one flat to give me the tallest opening at the front of that shelf.
Install Bottom, Back Stretcher
I flipped the side frame on its side to install the bottom, back board.
Attach Stretchers to Other Side Frame
This is the way I did it solo. If you have other folks to help hold the side frames, that would be great.
I turned the left side frame up right and clamped to the pole.
Then I brought in the right side frame and clamped it to my bench, with the wheels locked, of course.
The bottom 30″ board is my spare stretcher that is just dry fitted to help ensure the frame is square.
It took nearly every clamp I had to hold the entire frame square.
At the top, you can see one of the long bar clamps I have.
At the bottom you can see how I used three small clamps in series to span the frame.
Here’s how I clamped it on the back side.
My other long bar clamp is across the top.
And then 2 smaller bar clamps are used in series across the bottom.
Check for Square and Attach
Be sure to check all the corners for square.
Now you’re ready to screw in the 30″ stretchers to the other side of the frame.
Check Mower for Fit
Your frame should now be free standing.
Roll your mower in and check for fit.
If all’s good, you’re ready for the shelves.
Cut Shelving Plywood
Measure the inside of your frame, from upright to upright in the front, then repeat for the back.
Both should be 33″.
And your length along the side rails should be 45”.
Honestly, I would measure each shelf space and cut accordingly in case your frame is not perfectly square, which is common when using dimensional lumber.
I had some scrap 1/2″ plywood from a floor change, so that’s what I used for this project.
I cut my plywood on the floor using foam sheets under it.
See how to Safely Cut Plywood on the Floor for details.
And I use my homemade edge guide.
See Easy DIY Circular Saw Straight Edge Guide for details.
These little F clamps are perfect for this project as they are flat on the top, which is turned toward the floor in this application. Regular clamps are too tall.
Install Shelves
Install your first shelf on the bottom.
And clamp it into place.
I used my right-angle drill for the pilot holes and countersink.
And then my regular drill with the star bit that came with the screws wasn’t too tall and I could use it to attach the screws.
I used #8 x 1-1/4” construction screws to secure each shelf. I installed 3-4 on each side into the 2×4 support.
Hang Tools on Side
Your shelf should be complete now and ready for customization.
I used large screw-in hooks for hanging a few of my yard tools.
That’s It!
I hope you’ve enjoyed this presentation on how I made this over the lawnmower shelf.
Come on over and visit the Heartwood Art YouTube channel for more helpful builds and tips, just like this one.